10.31.2008

Happy Halloween!!!

HAPPY HALLOWEEN!!!
Photobucket
Pictures of the "Bride of Darkness" and the "Spider Fairy" to follow...

10.30.2008

Good night...

Good night! It's been a long day... Lindsey was still not feeling like herself and I held her most of the day while she slept. :) I let the girls skip soccer practice today too, it was chilly and very windy. I know if it's like this on Saturday still it wont keep them from playing but they didn't absolutely have to be there today so we came home. They got their Halloween costumes ready to go for tomorrow - Emily is being a Bride of Darkness and Carley is being a spider fairy, Lindsey will be a little black kitty cat. I also had to make a couple batches of cookies for the both girls' classes for their parties tomorrow. The school district frowns on sweets for the parties but come on, what's a class party without goodies? We keep it mostly healthy and the cookies will be their sweets. Anyway, got dinner and cookies out of the way and even managed to get a couple loads of laundry done (with Carley's help).

If I don't make it back here tomorrow, have a Happy Halloween! Lindsey has a doctors appointment in the late afternoon. After that I will go to my Mom's to hand out candy (we don't get tricker treaters since we don't live down in town) and Cris will make it there just in time to take the girls trick-or-treating. Me and Lindsey will skip trick-or-treating this year.;)

Have a great weekend and don't forget to adjust your clocks for daylight savings time...

Painted Chick Feeder (turned candy dispenser)

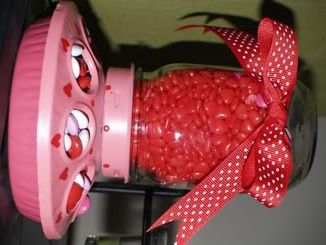
You can pick up a chick feeder at any farm supply, you can get the aluminum ones and paint them or they also come with a plastic dispenser that you add the canning jar too - colors vary. These make a fun little gift for teachers, the school office ladies, your bank, doctor's office, etc..

You can paint the base and just add a ribbon to the jar or skip painting the base if you buy a plastic one that is already a nice color. You can also print out a strip of paper to go around the jar... These are great for anytime of year but I think they are specially cute around Easter Time with the little egg candies. :)
valentine People Feeder

My favorite Gingerbread ornaments to make

Of course you know if I made more than one it's a pretty easy project!lol I don't remember where I got the instructions for these or even if I had instructions for them to be like they are so I apologize for not giving further credit where credit is due. I will explain the best that I can anyway because they really are easy and I think they turn out pretty cute, hope you do too...
gingerbread girls ornaments

Start with the clear glass ornaments, either the round bulbs or the round ornaments that are kind of flat (skinnier bulb). Mix a brown acrylic color of your choice with snow tex - I think I used Terra Cotta & cocoa mixed together. Use a sponge paint brush and dab it onto the bulb covering well. I attached yard to mine and found a place to hang them to dry. Add hair and mouth with snow tex writer. Once they are dry I add the bows & hanger and then I paint on the faces - no final sealer is neccesary. Let the faces dry and they are done!

I added glitter to this set:
gingerbread girls ornaments

I'm sure someone can get creative and make a cute snowman. I tried one real quick but he's not great but you get the idea:
snowman experiment

Another way to use your favorite graphics -trace & paint them!

I used a wood door hanger for this, you can pick them up at Michaels or other crafts stores or buy in bulk on line. I used a snowman from one of my creatables purchased at pccrafter I printed and then traced it onto the wood using graphite paper. Then painted and sealed it! This is another quick and easy gift or a fun decoration to keep for yourself...
snowman door hanger snowman door hanger (close up)
You can use other surfaces and use the same steps, here's a journal & wood box done the same way.
Photobucket

10.28.2008

I love my Cricut!

Have I ever told you "I love my Cricut"? Again, I just had a baby and I have two daughters that I drive 45 minutes each way to school everyday, soccer practice, girls scouts and other school activities so my day is pretty much filled with little time for my own "play" time. I am in the process of simplifying some things that I do though so that I have more time to play with my toys. Not that I don't love what I do all day, I do... If you're a Mom you know what I mean. Anyway, I thought I would share some cards I have made in the past, until I can add recent stuff this will make my blog a little less boring, I hope... Again, my favorite tool to use when making cards is my Cricut Expressions. But, I also love rubberstamps (rebuilding my supply after selling all the stamps I had a few years ago) and my computer. I am an embellishment junkie too - I have a hard time passing up new kinds of embellishments too. I think some of my favorites are flowers & rhinestones and I can't forget ribbon. After packing up my craft room I think I have more ribbon that Michaels Craft store and I actually believe I "need" more.hahaha
Photobucket
Photobucket
Photobucket
Photobucket
Photobucket
Photobucket
Photobucket
Photobucket
Photobucket
Photobucket
Photobucket
Photobucket
Photobucket
Photobucket
MissYou
Photobucket

Halloween Cards

One of my favorite things to do when I can is to make cards. It's fun, challenging, and for me it's so relaxing! Here's a few Halloween cards I managed to make last year, I don't think I have made much since then so I'm really looking forward to getting my crafting supplies organized so I can spend a little more time making cards and other things.

The little ghost card I made using my Cricut. I made it before the design studio came out, I keep thinking of ideas to us the design studio software for too - I guess I better start saving my change so I can buy it and use it when that glorious day comes that I get to spend an hour or two playing with all my paper and glue that is waiting to get used up.hehehe

Photobucket

I made this card using a little kit I received in a card swap challenge...
Photobucket

Photobucket

Here's a matching goody bag to match the little ghost cards:
Photobucket Photobucket

Simple Christmas Ornaments

Every year I make ornaments for certain people, like the nurses at our pediatricians office. Two of the nurses have always been there since I started taking my oldest daughter there 11 years ago. The following year is when I started taking them ornaments and they always go down the list of ornaments I have given them over the years. One of them always tells me about when she's taking her ornaments out for the tree and how she always thinks of me and the girls when she takes those ornaments out. Ornaments make great gifts for teachers, school office, lunch ladies, school yard supervisors, mail people, favorite store clerks, etc...

This year I am starting with some very simple ornaments, I don't know if I will find time to do much more. I bought a bunch of the little white ornaments at the end of the season last year when they were on clearance for like 25 cents each. I planned on using waterslide decals to decorate them but first I will use up some rub-ons that I bought at the same time because it's fast, easy, and I think the end result is pretty cute.

Here's a picture and the simple instructions are below the picture:
Photobucket
Wipe down the ornaments with a cleaner that wont leave behind any residue. Choose the rub on you would like to add - these were the snowman faces, I also have some little winter scenes that I will use in the centers of some of the ornaments. There is no wait time once the rub-on is applied so now you can embellish the ornament some more. I added ribbon and fancy hangers to them and on some I also applied snow-tex and glitter. That's it! It doesnt' get much easier or faster and they are well received too.
You may want to add a gift card or a little sweets by using the same idea on a band-aid tin like this:
Photobucket

Hmmmmm????

Hey Friends!

Okay, so I really don't have enough hours in the day to do anymore than I what I get done - which on some days just isn't very much. Between my sweet new baby, the big girls and their school, soccer, and girl scouts my house really suffers as well as my need/want to do a little crafting. That is okay though, I wouldn't trade my girls for nuttin' at anytime. They will only be kiddos once so I am going to take this chance to make the best impression on them that I can make. :)

So, when I have time I am hoping to keep in touch here and share crafts that I am working on or better yet crafts that I get completed. I will also have to share the biggest part of my life too: My sweet family - husband Cris and my girls; Carley, Emily, and Lindsey.

I am in the process of reorganizing my craft room. It's not going as quickly as I had hoped for but when it gets finished I will be able to do more without wasting too much time. I recently packed everything up in that room and it now resides in my living room and down the hallway. I got new furniture (Thanks to Cris and Carley for getting it in there and put together), I am hoping I will have a storage place for everything now! I plan to get everything put away by this weekend, as long as my sweet baby is feeling better that is.

I look forward to learning more about this "blogging" hobby for sure! See ya later alligator...